Step 1 - Go download eeeXubuntu. You can find a complete mirror list on the main support page for the distribution - http://wiki.eeeuser.com/ubuntu:eeexubuntu:home
Step 2 - Backup your thumbdrive. If you intend to keep what's on your thumbdrive now, it would be wise to back it all up, because we will be wiping it clean of all data. If you don't want to back it up, or don't care to lose everything - move to Step 3. To make a backup, hop onto your "everyday Linux PC". If you only have a Windows PC this can still be done, but may be a little trickier. See this page for deatails.
On your Linux PC, open up a terminal. Insert your thumbdrive, and then wait about 8 to ten seconds. Now in your terminal, run 'dmesg'. Your results should look something like this ...
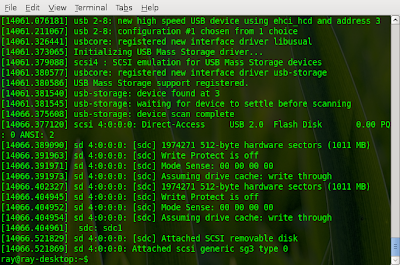
Note that your device name should appear here several times and probably starts with 'sd'. Mine is 'sdc'. Knowing this, we can back it up using dd. dd is really simple. You tell it what to use for input ("if" means "in-file") and output ("of" means "out-file"). Now run 'dd if=/dev/sdc of=/home/yourname/filename.img'. If your thumbdrive is large, this may take a while. We are creating a block-by-block or exact duplicate of the device. It will look a bit like this ...
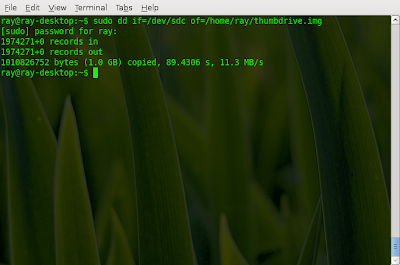
Now we have a complete backup of your thumbdrive and we are ready to proceed.
Step 3 - Prepare your thumbdrive. Burn your iso, and boot to it from your "everyday" computer. This is a live CD, so it doesn't matter what OS you are running when you use this disc. Additionally, this CD will not install anything unless you tell it to do so! As it boots up, choose the top option to "start or install Xubuntu". Then wait until it comes up to the desktop.
Once you are booted up we have some preparation work to do on your thumbdrive. First, we need to remove all of the partitions it presently has. Plug in your thumbdrive, and wait 8 to 10 seconds. Your thumbdrive will probably pop up in a window, and you will see it's contents displayed. Close this window. Then notice that there is a new icon on your desktop for your thumbdrive. Right click on this icon, and choose "Unmount Volume".
Open up a terminal with Applications > Accessories > Terminal. Now, in the terminal window, do a 'dmesg' as you did earlier. Note your device name of your thumbdrive which usually starts with 'sd'. It will look something like this ...
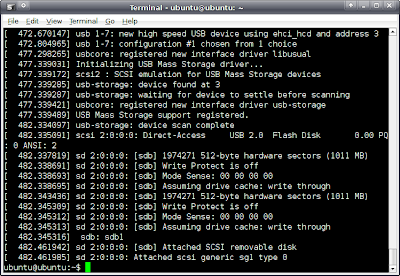
Now in your terminal, do 'sudo fdisk /dev/sdb' where sdb is your thumbdrives device name. At the prompt, type 'p' to have it print a list of your partitions. In my case, I had only one. Some thumbdrives will ship with four or more which contain all sorts of encryption software or special utilities. If you have multiple partitions, you will have to specify which one to delete. Type a 'd' and if prompted, enter the number of the last partition from the list. If you have more than one, repeat option 'd' for each partition until they are gone. Then do a 'p' again to make sure it's empty.
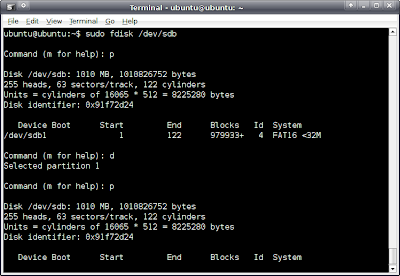
Now do a 'n' for a new partition. Then 'p' for primary type. Then a '1' for the first partition. For the starting and ending cylinders, just hit enter to take the defaults. Lastly, do option 'p' again to see what it looks like. Notice that you now have a partition number after your device name. In my case it's /dev/sdb1. Make a note of this 'partition name', you will need it shortly. Before leaving fdisk you must make two more important changes. First change the partition type. Do option 't' to change the type, and when asked for the "Hex code" enter the letter 'e'. This will give you the old-school "Windows 95 FAT16 Partition" that the installer wants. Lastly, enter option 'a', and when asked for a partition number enter '1'. This will make your thumbdrive bootable!!
Now is a good time to enter 'p' one more time and make sure it looks something like this ...
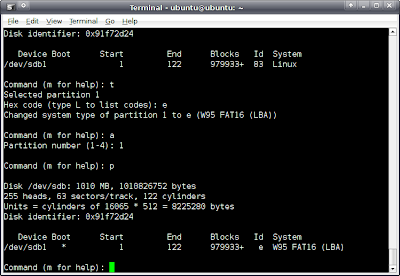
You are done, so use option 'w' to write out your changes. It will do some 'syncing' and quit the utility for you. But you are *NOT DONE*.
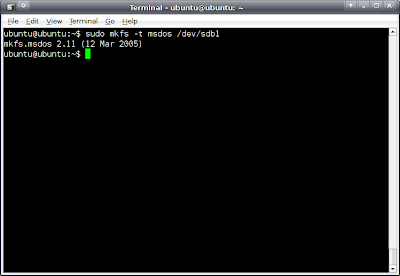
Step 4 - FORMAT your new partition. The second time I ran through this, Xubuntu got confused and remounted my filesystem after I quit fdisk. You may want to check your Desktop for what looks like a mounted thumbdrive. If you have one, right click on it and choose to "Unmount Volume". Then wait about 10 seconds. The icon will probably remain, but don't worry about it. Now, in terminal run 'sudo mkfs -t msdos /dev/sdb1' where '/dev/sdb1' is your new partition which you created in fdisk. Do not fudge the device name or you may end up wiping out the contents of your "everyday system". This process runs remarkably fast - and is completely irreversible. It should look like this ...
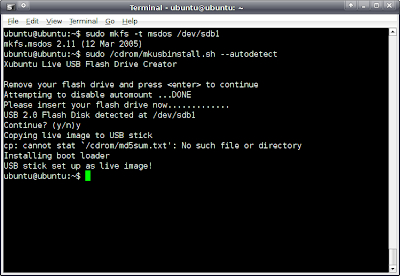
Step 5 - Use the Xubuntu thumbdrive installation creator utility. It will work like a champ now that your thumbdrive has been *properly prepared*. To run this utility, in terminal do 'sudo /cdrom/mkusbinstall.sh --autodetect'. It will tell you to remove your flash drive and hit enter. Do that. Then it will tell you to reinsert it. So put it back! It should detect your thumbdrive and show you the device and partition name. If it's the same from before - we are ready to go. It will ask if you want to continue. Say 'y'. What happens next is a lot of copying to your thumbdrive. The CD will spin like wild, and your thumbdrive light (if you have one) will flicker for a while. Go get some coffee and wait. You may get an error or two in this process, such as "cannot stat `/cdrom/md5sum.txt'". If you get more like 5 to 10, then something is wrong. If you get some message about resizing partitions on your thumbdrive - you definitely did something wrong and you should repeat the process of removing and re-adding your partition.
Otherwise the process should finish nicely like this one did ...
Now you can remove your thumbdrive, and reboot your everyday PC. Make sure you remove the installer disc now. Keep it around, you never know when you might want to use it again.
Step 6 - Install eeeXubuntu. Insert the thumbdrive in your eee PC, hold down the ESC key, and boot it up. Then use the USB:USB Flash Disk as your boot device. The rest is smooth sailing. If you need help with general installation - refer to the main installation page here.
Step 7 - Restore your thumbdrive. Now that you have installed eeeXubuntu you may want to restore what was on your thumbdrive. Boot up your "everyday Linux" box that you used to make the backup earlier, and open a terminal window. We are going to simply reverse the 'dd' command we ran in Step 2 so that the "if" is your thumbdrive image, and your "of" is your thumbdrive device. Go ahead and plug in your thumbdrive now. It will probably get auto-mounted and pop up in a window. Close that window. Then go to your desktop and find the icon for it. It will probably be called something generic like "1.0 Gig Media". Right click it, and choose "Unmount Volume".
Now open a terminal and do a 'dmesg'. Make sure the device name of your thumbdrive has not changed. It should be the same as it was before. Next do 'sudo dd if=/home/yourname/thumbdrive.img of=/dev/sdc'. Your thumbdrive will be busy for a while, churning away while everything is restored. Go get more coffee.
When it's done, you should be able to unplug your thumbdrive - wait a few seconds - and then plug it back in. It will get auto-mounted and everything will be restored, looking as it did before you made it into an eeeXubuntu installer.
I sincerely hopes this helps a few folks out there. I ran into many obstacles in getting my eee PC up and going with eeeXubuntu, but it was well worth the efforts. If you find any errors, have suggestions, or you found this useful - please drop me a comment.


Note that a 1GB is sufficient, but a 512MB stick is too small.
ReplyDeleteJust one minor point. In the section about backing up the thumb drive, you said you should run 'dmesg if=/dev/sdc of=/home/yourname/filename.img'
ReplyDeleteIt should actually be 'dd if=/dev/sdc of=/home/yourname/filename.img'
Ooops! Typo alert. Thanks for the heads up. I have corrected the entry.
ReplyDeleteThank you so much, it was very helpful. I was struggling with different guides until I came upon yours! Thanks a ton for the clear instructions.
ReplyDeleteHello,
ReplyDeleteI have a EEEpc 1000, installed Ubuntu 8.04 throught USb boot. Perfect.
But this afternoon, while not using it, it went to sleep mode, and could'nt restart it.
Sionce then, rebooting is ok, it starts but 3 -4 min after... dark screen with curso blinking. Nothing else.
I have tried to reboot and re-install : even bootable usb start and after a while instalation stops and dark screen with cursor...
Hell !! What happens ???
Thanks !
henrimarc, I would get onto http://forum.eeeuser.com and ask for help with this problem. I am not familiar with the 900/901/1000 family. It's quite different than my (now old) 701 series. :-)
ReplyDelete