Tuesday, June 17, 2008

Kismet Newcore

I was downloading and building Kismet once again today. I have done this a lot lately, because I keep blowing up my OS and having to reinstall.

I decided to go all out and install the "newcore" distribution. This version is available through svn and basically represents what the developers want. It's been built from the ground up to offer easier development, add-ons, and better configuration for the user.

I only really used it for 10 minutes or so. It works. It looks little odd. I'm not sure the graphical representation of packets is really necessary, but of course you can customize all that.


My buddy DM thought it looked a little like Atari 2600 graphics. That got me to thinking about my favorite childhood game "Adventure". That lead to a Google search where I learned that someone made a homebrew Adventure II for the Atari 5200 emulator. Just about the time I got the game to play I had to get back to work.

Also - I joined twitter as "rayhaque", so if you are a fellow twitter feel free to stalk me. I read about the service ages ago and I didn't really understand what it's for. I still don't really get it, but I expect I will figure it out soon. :-)

EEE PC - Migrating to 8.04

Being haunted with some rather odd driver issues I have been thinking about moving to Ubuntu or Xubuntu 8.04 for a good week now. Yesterday I bit the bullet knowing full well that this installation would cripple most of my drivers and leave me fumbling to restore all my broken functionality. But you know ... it wasn't *that* bad.

Creating a Live USB stick of Xubuntu 8.04
This was a bit more challenging than I had imagined. eeeXubuntu (release 3) came with this nice little shell script that does all the work of making a thumbdrive/jumpdrive into an installation source for you, so you can skip out of some lengthy tutorial steps. That script is not part of a standard Xubuntu release, so this is what I did.

1) I needed a copy of mkusbinstall.sh from the eeeXubuntu 7.10 disc. Ths involved booting it up, and copying the file onto a thumbdrive. You can also get it from here. I mirrored it for anyone else attempting this.

2) Next I downloaded and booted up Xubuntu 8.04, and inserted my thumbdrive. Then, I copied the script my thumbdrive out to my home directory.

3) Next I prepared my thumb drive again with fdisk and mkfs. This process is documented very well in this blog entry.

4) You need "syslinux" installed for this script to run. One of the magical factors of Live distributions is installing software. Open up a terminal. Go ahead and do a 'sudo apt-get install syslinux'. This will take a moment or two, and you will be done.

5) Now in your terminal, run the script you copied over earlier like this 'sudo ./mkusbinstall.sh --autodetect'. The rest should be smooth sailing as you just wait for copying to complete. You *will* get a few error messages about symbolic links. But don't mind those.

6) Boot your eee PC up to your thumbdrive and get to installing.

Keep in mind, you will need to install madwifi drivers from source to restore your wireless settings. And there are far more tweaks and hacks to fix the remaining stuff. Since I combined about three different methods myself ... I will not try to offer advice on that topic.

Check the eeeUser.com forums for more info.

Additionally, since installing the latest svn source for the madwifi driver - I am getting about 15 percent better signal quality with the built in Atheros WiFi card. It was enough boost to allow me to connect to a network up the street from my house without using any external cards or antennas. Awesome?

Friday, June 13, 2008

EEE PC - Almost Wardriving

After all my failures yesterday I came to the realization that I would have to find a plan B and execute it. An external USB WiFi adapter might be just what the doctor ordered. Luckily I have access to an entire drawer of Linksys USB WiFi adapters which are just collecting dust.

These adapters use the rt2500 chipset which is pretty well suported thanks to the efforts of this project. I plugged the card in, and it was detected. Simple, right? Well not quite.

It seems that the OS wants to load the rt2500usb driver for this card, even though the card in reality is an rt2570. That would be fine if I wanted to *use* this card to join access points and gain Internet access. But my end goal is to use this as a weapon of wardriving. For that, it did not seem to work well. I set my source in Kismet as "source=rt2500,wlancantenna" and started it up. It detects about 3 wireless devices, but cannot seem to see the high powered b/g cisco devices which are everywhere around me.


This seemed to me to be a driver issue of sorts. Heading back to the project download page I found that there was a stand-alone driver for the rt2570 chipset. I downloaded it, built the module, and installed it - all rather easily. The problem is, when I plug in the card the OS still detects it as an rt2500. This can be fixed by opening up /etc/modprobe.d/blacklist (as root) and adding "blacklist rt2500usb" to the bottom of the file. Note that if you blacklist "rt2500" you will likely end up with a non-functioning setup.

Now, with the card removed and *ALL* "rt" related modules removed - I can reinsert the card and this is the result I get.


Note that while Kismet (in the background of this shot) picks up *EVERYTHING* - the OS now doesn't know how to read the signal levels on what it has found. I'm not sure if that is really a problem. I can live with it.

I have also taken one of these cards, gutted it, and through the miracle of duct tape I have merged it with a single cable cantenna design. It's not a pretty site, but I will take pictures at some point.

My New Toy
I am a bit destracted with this little project this morning because I got a slick new toy for fathers day. It's a Garmin Nuvi 200 which is a GPS "driving assistant" (with lot's of additional toys and uses).

Last night I unboxed it, turned it on, and started immediately setting it up. Yet, everytime I got to the part where it hooks up to satelites - it shut off. It seems that they don't send these out of the factory on a full charge. Thankfully this unut can be charged from USB (unlike some of the competitive models). There is a wall charger accessory which you can buy but really don't need. It comes with a nice mounting kit for your windshield or dash, and a 12v socket adapter too.

I went online and registered my unit, and since I am entitled to a free map update I went ahead and started that up. Alas, it needed to install a browser plugin so I had to reboot into ... Windows XP. :-( I installed the plugin, it warned me that the file download could take hours, I laughed, and started it up. But then I saw that this could take hours - because the file was 2.04GB. Meanwhile Windows XP is asking (for about the fifth time) if I would like to reboot. It had to go and install a bunch of updates and it wouldn't shut the fuck up about them. Knowing that Windows will eventually reboot my PC against my will - I rebooted it myself.

But then when I tried to go through the registration and map download again it said "you all ready got your free maps - now beat it" in so many kind words. I HATE YOU WINDOWS. After some hunting around in the web site I was able to find where I could re-download the file. But when it was completed, I had to wait another 15 minutes while Windows copied 2GB from my Temporary Internet Files - to the Desktop (why do they STILL do things this way? Firefox doesn't!). At this point I was happy to reboot back into Linux where logic still prevails.

This morning I popped out the ashtray in my bug and used my tie clip to lock the GPS onto my dash. Then I drove to work. It's two miles down a straight road and I haven't gotten lost yet (not even once) - but I was itching to see how well this thing works. As I came to where the street splits in all directions it shouted "turn left in zero point one miles" and then when I hit the spot it said "turn left". Nice. Then as I cruised down the road it told me "1.7 miles remaining". As I approached the hospital I decided to throw it a curve ball and I took a sharp right to head up the back of the hospital (opposed to going to the front door lie a visitor would). The Garmin saw that I had turned off and a moment later said "recalculating!". With that, it had a new path for me (which is the way I was heading).

I must say, this is a nice little unit. It will be fun to play with this when we head out to a cabin 350 miles from here for vacation. In the mean time, I wonder if I could rig this into my laptop and use it's GPS capabilities for wardriving?

Wednesday, June 11, 2008

EEE PC - Replacing the WiFi Card

Over the weekend I went onto eBay and bought myself a Dell TrueMobile 1390 b/g wireless card for my eee PC. I am out to replace the Atheros that comes with it, which just doesn't seem to cut the mustard when it comes to wardriving. I bought the card Sunday night for $15 (shipping and all) and it was in my mailbox Tuesday morning. Thanks US Postal Service! :-)

Back at work I got out my set of screwdrivers and went to work. Installing the card was not difficult, but it was time consuming and a little tedious. As you can imagine, everything in the eee PC is small and fragile. I found this particular forum post to be most helpful in determining how to get the lid off and expose the bottom of the motherboard. With everything back together, I booted it up.

I didn't get the "blue light" on the eee PC which was a little concerning. I hadn't thought of how I would get the card to interact with the buttons or quick keys on the eee PC. Once booted I could see that I had ... no wireless card. Not that I expected the driver to load and for everything to work that simply, but it sure would have been nice.

The first thing I tried to get it working was to look for drivers to install. I ran an apt-cache bcm43xx and I found a utility of sorts which helps to load firmware onto a Broadcom card. Why would I want to play with firmware? It seems you have to. The way this card was designed you have a file available which is used to load the card every time it comes up. This is done pretty simply in Windows using Broadcom drivers. Linux it seems, is another story.

There also seems to be a newer style and older style driver. There have been two projects over the years to make these cards work. The old bcm43xx drive has been written off as a "legacy driver" and everyone seems to be using the new b43 driver instead. All sorts of good information on the topic can be found here. I dove feet first into the instructions on the project page and about midway through realized that while I was not getting any error messages, I was having zero success in getting this to work. Additionally, I was skimming through the instructions and really had no idea what I was doing.

Also I noticed I still had no blue light. I wondered if my "hot key" still works. I did a Fn+F2 - and the light came on. Hooray! But that means all the screwing around I had done trying to load drivers was in vain, because my card was turned off the entire time. Duh. Rather than continue on with my path of driver destruction, I opted to back up my home directory to an SD card and re-install the operating system. My hope was that in reinstalling eeeXubuntu the card would be magically detected and the driver would be loaded for me like the Atheros card was when I installed the first time.

And the survey says ... NO DICE.

A fresh and clean Operating System would not find it. Perhaps an up to date Operating System would find it and use it. Next I performed a "dist-upgrade" knowing that I would probably break a ton of other stuff in the process. The dist upgrade took the better part of four hours. Yes, FOUR HOURS. When it was done, I had new versions of everything - but none of my hardware worked any more, not even the on-board wired NIC. Downer.

After having no luck getting drivers to work I began to wonder if the hardware was even being detected. After all, loading the driver didn't give a single error. I ran an 'lspci' and compared the results with what would see with an Atheros card installed. No wonder, the Dell Broadcom card wasn't being picked up at all by the BIOS. This whole thing had been a waste of time, and $15.

With that, I went downstairs, got out the screwdrivers, and put the Atheros card back in. Then, I reinstalled the eeeXubuntu OS to put me back to ground zero. Ugh.

I am not ready to give up, but whatever I come with is going to have to be external. I did some searching around for information on using the Intel 3945 in the eee PC and I was brought right back to the eeeuser.com forum to find some more bad news. That slot it seems, will not detect anything but an Atheros branded card.

For my next trick ... I am thinking of getting an external USB wireless card and making it part of a cantenna. Then the antenna connection would go right into the can - and a single USB cable would come down to the laptop. More on this revelation later.

Monday, June 09, 2008

EEE PC - Wireless Comparisons

Today, just for giggles I grabbed a spare USB Linksys WiFi b/g adapter off my desk and plugged it into my EEE PC. It was imediately recognized and available for use which I wasn't really expecting. Generally in Ubuntu to have to go through driver hell to make one of these work.

But then ... I couldn't actually join any networks that I found and I really didn't care to. What I was interested in seeing was what the signal strength looked like in comparison with the internal Atheros card. This was easily viualized simply by showing the list of available networks. As you can see by the screenshot here, the external USB was about 20+ percent more powerful.

Saturday, June 07, 2008

EEE PC - Updating your MadWiFi driver

I've been doing a little hacking with my madwifi_g driver. I have not been at all impressed with the reception of the card. It seems my old iBook can pull in two more access points than my eee PC ,and at double the signal strength. Thinking that it could be the card, I have found a few ineffective "hacks" to control it's settings. Even though they didn't work, here they are.

Increase your transmit strength
Did you know that you can turn up the transmit power of your Atheros card? Did you know that it's all ready turned up all the way? You can check it with the following command:

ray@eee-q050805:~$ iwconfig ath0
ath0 IEEE 802.11g ESSID:"ODDREE" Nickname:""
Mode:Managed Frequency:2.462 GHz Access Point: 00:90:4C:7E:00:64
Bit Rate:5 Mb/s Tx-Power:17 dBm Sensitivity=1/1
Retry:off RTS thr:off Fragment thr:off
Power Management:off
Link Quality=23/70 Signal level=-72 dBm Noise level=-95 dBm
Rx invalid nwid:1552 Rx invalid crypt:0 Rx invalid frag:0
Tx excessive retries:0 Invalid misc:0 Missed beacon:0


Where it days Tx-Power: 17 dBm, that's your current settings. To turn it down, you would do this:

ray@eee-q050805:~$ sudo iwconfig ath0 txpower 16

The only reason to turn it down is to save on battery. Otherwise, you are just limiting your "reach" and your speed. Theoretically you could turn it up with a value of 18, but 17 is the best the card can do ... which is pretty weak.

Change your Antenna
You can also change the antenna that your card is using. It has two and the driver decides how it uses them. They call that automated balancing "diversity". If you want to force the driver to use one antenna or the other you have to turn off diversity. I wrote these three shell scripts to change the settings around - but I was never able to make it work any better. You would have to run these with sudo.

#Use antenna 1
/sbin/sysctl -w dev.wifi0.diversity=0
/sbin/sysctl -w dev.wifi0.txantenna=1
/sbin/sysctl -w dev.wifi0.rxantenna=1

#Use antenna 2
/sbin/sysctl -w dev.wifi0.diversity=0
/sbin/sysctl -w dev.wifi0.txantenna=2
/sbin/sysctl -w dev.wifi0.rxantenna=2

#Use diversity to choose
/sbin/sysctl -w dev.wifi0.diversity=1

Update your MadWifi Driver
This is not a good idea. At all. But I had to try it. If you do this procedure you may ruine your wireless driver beyond repair (not knowing your skill level in linux). That said, here is what I learned.

The madwifi_g driver and the future driver "ath5k" do not have support for the Atheros card used in the eee PC. If you download new, old, or even "svn source" it will compile cleanly and then not work at all. Digging through a forum I found a guy mentioning that the kind folks at madfifi.org have created a patch to make the code work for us eee PC users. Ths patch is also incorporated into the nightly builds for the driver releases. That means you can download it, compile it, and put it to use.

Download the latest patched source code from: http://snapshots.madwifi.org/special/

Look for the newest releast for madwifi-ng, which is labeled for ar5007 (this is the card that the eee PC uses). Download the source, and then do a 'tar -xzvf filename.tar.gz". Next, cd into that directory in a terminal, and then do a 'make'. If your make fails, ensure that you have installed the 'build-essential' package. Now do a make install. It will probably find your existing driver and offer to remove it for you. Allow it to. Then reboot. You will be using the latest driver, and probably won't notice anything different about it.

Conclusion
While not really accomplishing anything, I think I have pretty well proved that the real problem with the lack of signal strength is because the hardware sucks. For my next project, I am going to look at the specs for the other cards which fit the mini-PCI-express slot (for which there are only two or three manufactured).

When is Proxim going to give us a mini-PCI express b/g/n card?

Edit: A little more research on card strength
It seems that there are really only two other contenders for wireless which have the mini PCI express architecture. Those are the Dell Truemobile 1390 and the Intel 3945. The Intel of course uses an Intel chipset while the Dell uses the popular Broadcom chipset. Both seem to be equally compatible, but as far as "which one is better" I still can't tell.

Perhaps I am silly for wanting to know how powerful a card is as the manufacturers don't seem to really advertise these figures. Dell says "this card makes the Intenet work on the computer" (it's not tht dumb, but nearly). Intel says "15db - depending on power usage" (but doesn't tell you the max possible).

I used a Google tactic to get some information. I searched for "dell 1390 tx-power=" and "intel 3945 tx-power=". I found a lot of sad and disheartened users who couldn't get WPA to work, didn't know how to renew an IP address, etc. But what I really was looking for was a dump of their wireles card statistics. Here are two examples of what I found ...

intel 3945
wlan0 IEEE 802.11g ESSID:"xxxx"
Mode:Managed Frequency:2.462 GHz Access Point: 00:17:9A:52:1A:93
Bit Rate=54 Mb/s Tx-Power=27 dBm

dell 1390
[root@localhost ~]# iwconfig wlan0
wlan0 IEEE 802.11g ESSID:off/any
Mode:Managed Frequency:2.462 GHz Access Point: Not-Associated
Bit Rate:54 Mb/s Tx-Power:32 dBm


If these statistics are accurate, it means that the Intel card does another 10 dBm's of power more than the Atheros card ... but the Dell TrueMobile 1390 nearly doubles up on power. With the low cost and high availibilty of the Dell card, I may need to invest in one.

Thursday, June 05, 2008

EEE PC - eeeXubuntu Install Using Thumbdrive

So, you want to install eeeXubuntu to your eee PC - but you don't have an external CD-ROM. Or perhaps you are in the same boat as me. I have an external HP burner that a friend gifted me a few years back, but the eee PC won't recognize it or boot from it. If you have a thumbdrive that's at least 512MB, then you are in luck. In this blog entry I will show you how to turn your thumbdrive into a bootable installation "disk" which you can then use to install eeeXubuntu to your eee PC.

Step 1 - Go download eeeXubuntu. You can find a complete mirror list on the main support page for the distribution - http://wiki.eeeuser.com/ubuntu:eeexubuntu:home

Step 2 - Backup your thumbdrive. If you intend to keep what's on your thumbdrive now, it would be wise to back it all up, because we will be wiping it clean of all data. If you don't want to back it up, or don't care to lose everything - move to Step 3. To make a backup, hop onto your "everyday Linux PC". If you only have a Windows PC this can still be done, but may be a little trickier. See this page for deatails.

On your Linux PC, open up a terminal. Insert your thumbdrive, and then wait about 8 to ten seconds. Now in your terminal, run 'dmesg'. Your results should look something like this ...


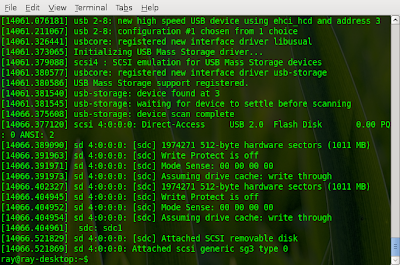
Note that your device name should appear here several times and probably starts with 'sd'. Mine is 'sdc'. Knowing this, we can back it up using dd. dd is really simple. You tell it what to use for input ("if" means "in-file") and output ("of" means "out-file"). Now run 'dd if=/dev/sdc of=/home/yourname/filename.img'. If your thumbdrive is large, this may take a while. We are creating a block-by-block or exact duplicate of the device. It will look a bit like this ...


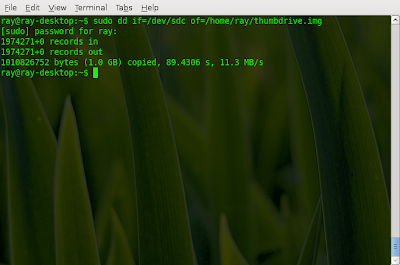
Now we have a complete backup of your thumbdrive and we are ready to proceed.

Step 3 - Prepare your thumbdrive. Burn your iso, and boot to it from your "everyday" computer. This is a live CD, so it doesn't matter what OS you are running when you use this disc. Additionally, this CD will not install anything unless you tell it to do so! As it boots up, choose the top option to "start or install Xubuntu". Then wait until it comes up to the desktop.

Once you are booted up we have some preparation work to do on your thumbdrive. First, we need to remove all of the partitions it presently has. Plug in your thumbdrive, and wait 8 to 10 seconds. Your thumbdrive will probably pop up in a window, and you will see it's contents displayed. Close this window. Then notice that there is a new icon on your desktop for your thumbdrive. Right click on this icon, and choose "Unmount Volume".

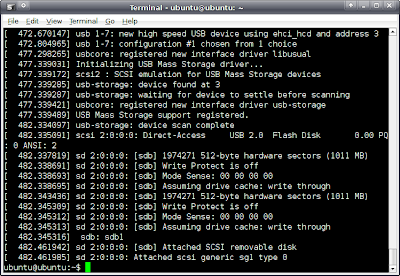
Open up a terminal with Applications > Accessories > Terminal. Now, in the terminal window, do a 'dmesg' as you did earlier. Note your device name of your thumbdrive which usually starts with 'sd'. It will look something like this ...


Now in your terminal, do 'sudo fdisk /dev/sdb' where sdb is your thumbdrives device name. At the prompt, type 'p' to have it print a list of your partitions. In my case, I had only one. Some thumbdrives will ship with four or more which contain all sorts of encryption software or special utilities. If you have multiple partitions, you will have to specify which one to delete. Type a 'd' and if prompted, enter the number of the last partition from the list. If you have more than one, repeat option 'd' for each partition until they are gone. Then do a 'p' again to make sure it's empty.


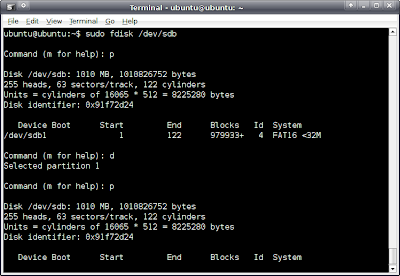
Now do a 'n' for a new partition. Then 'p' for primary type. Then a '1' for the first partition. For the starting and ending cylinders, just hit enter to take the defaults. Lastly, do option 'p' again to see what it looks like. Notice that you now have a partition number after your device name. In my case it's /dev/sdb1. Make a note of this 'partition name', you will need it shortly. 
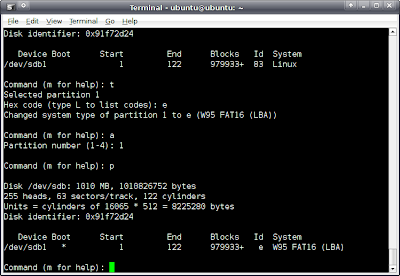
Before leaving fdisk you must make two more important changes. First change the partition type. Do option 't' to change the type, and when asked for the "Hex code" enter the letter 'e'. This will give you the old-school "Windows 95 FAT16 Partition" that the installer wants. Lastly, enter option 'a', and when asked for a partition number enter '1'. This will make your thumbdrive bootable!!

Now is a good time to enter 'p' one more time and make sure it looks something like this ...


You are done, so use option 'w' to write out your changes. It will do some 'syncing' and quit the utility for you. But you are *NOT DONE*.

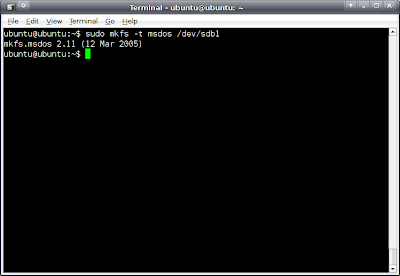
Step 4 - FORMAT your new partition. The second time I ran through this, Xubuntu got confused and remounted my filesystem after I quit fdisk. You may want to check your Desktop for what looks like a mounted thumbdrive. If you have one, right click on it and choose to "Unmount Volume". Then wait about 10 seconds. The icon will probably remain, but don't worry about it. Now, in terminal run 'sudo mkfs -t msdos /dev/sdb1' where '/dev/sdb1' is your new partition which you created in fdisk. Do not fudge the device name or you may end up wiping out the contents of your "everyday system". This process runs remarkably fast - and is completely irreversible. It should look like this ...


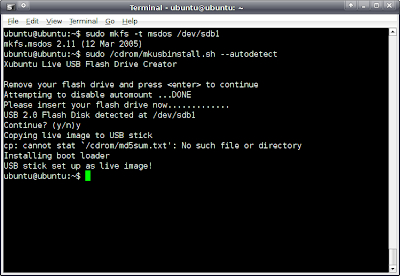
Step 5 - Use the Xubuntu thumbdrive installation creator utility. It will work like a champ now that your thumbdrive has been *properly prepared*. To run this utility, in terminal do 'sudo /cdrom/mkusbinstall.sh --autodetect'. It will tell you to remove your flash drive and hit enter. Do that. Then it will tell you to reinsert it. So put it back! It should detect your thumbdrive and show you the device and partition name. If it's the same from before - we are ready to go. It will ask if you want to continue. Say 'y'. What happens next is a lot of copying to your thumbdrive. The CD will spin like wild, and your thumbdrive light (if you have one) will flicker for a while. Go get some coffee and wait. You may get an error or two in this process, such as "cannot stat `/cdrom/md5sum.txt'". If you get more like 5 to 10, then something is wrong. If you get some message about resizing partitions on your thumbdrive - you definitely did something wrong and you should repeat the process of removing and re-adding your partition.

Otherwise the process should finish nicely like this one did ...


Now you can remove your thumbdrive, and reboot your everyday PC. Make sure you remove the installer disc now. Keep it around, you never know when you might want to use it again.

Step 6 - Install eeeXubuntu. Insert the thumbdrive in your eee PC, hold down the ESC key, and boot it up. Then use the USB:USB Flash Disk as your boot device. The rest is smooth sailing. If you need help with general installation - refer to the main installation page here.

Step 7 - Restore your thumbdrive. Now that you have installed eeeXubuntu you may want to restore what was on your thumbdrive. Boot up your "everyday Linux" box that you used to make the backup earlier, and open a terminal window. We are going to simply reverse the 'dd' command we ran in Step 2 so that the "if" is your thumbdrive image, and your "of" is your thumbdrive device. Go ahead and plug in your thumbdrive now. It will probably get auto-mounted and pop up in a window. Close that window. Then go to your desktop and find the icon for it. It will probably be called something generic like "1.0 Gig Media". Right click it, and choose "Unmount Volume".

Now open a terminal and do a 'dmesg'. Make sure the device name of your thumbdrive has not changed. It should be the same as it was before. Next do 'sudo dd if=/home/yourname/thumbdrive.img of=/dev/sdc'. Your thumbdrive will be busy for a while, churning away while everything is restored. Go get more coffee.

When it's done, you should be able to unplug your thumbdrive - wait a few seconds - and then plug it back in. It will get auto-mounted and everything will be restored, looking as it did before you made it into an eeeXubuntu installer.

I sincerely hopes this helps a few folks out there. I ran into many obstacles in getting my eee PC up and going with eeeXubuntu, but it was well worth the efforts. If you find any errors, have suggestions, or you found this useful - please drop me a comment.

EEE PC - Meet iPod Nano

It was only a matter of time before I introduced my eee PC to my iPod Nano. If I plan on listening to music with my eee PC, it only makes sense to play it from my iPod (rather than eat up limited space with duplicate files). I have tried a lot of software for linux which plays music, but none works better with the iPod than Rhythmbox.

To install Rhythmbox, open a terminal and do a 'sudo apt-get install rhythmbox'. There are a bunch of dependencies - go ahead and let it install those. One thing I found, is that I was unable to play *any* of my music. That's because Rhythmbox does not incude the gstreamer libraries needed to play them. To add the missing libraries, go to your terminal and do a 'sudo apt-get install gstreamer0.10-plugins-ugly'. Note that there is also a gstreamer0.10-plugins-good and a gstreamer0.10-plugins-bad set of plugins which may be required to play other obscure non-mp3 formats.

So now I can plug in my iPod, open up Rhythmbox, and start rocking out. I noticed my album art is missing, but I don't know that it bothers be enough to fix it. Maybe I will work on that later.

Wednesday, June 04, 2008

EEE PC - Screen Real Estate

The screen on the eee PC is pretty damned impressive. The tiny screen on my old 3-Com Audrey was just about the same physical size as my 4G Surf, but it packed in about half the pixels. These days you get an easy 800 pixels across in such tight space that my old eyes simply can't count the dots.

Of course, you are still taxed with a 'short' display. It's not a problem in Terminal or in your web browser, because you can scroll. But sometimes you get a window that's too big and you can't get to the close or okay buttons. The fix for that by the way, is to hold Alt while clicking and dragging the window around.

Looking for more space in Firefox? - Open up Firefox. Right-click the toolbar somewhere such as over-top the Stop button. If you don't use the Bookmarks bar (I never do) you should uncheck that. Also notice how big the buttons are in Firefox? You can downsize them. Right-click the toolbar again and choose 'Customize'. In the window that pops up, look to the bottom for an option to 'Use Small icons' and check that box. You have just increased your browsing real estate. You may even decide to part with your status bar (but I like mine too much). To remove it, click View and uncheck Status Bar.

Want more space in your taskbar? - Taskbars are always over-crowded but the eee PC has a little less horizontal space than you may be used to. How about getting rid of the word 'Applications' on the Application button? An eeeuser.com forum poster, Red Penguin found this remarkably easy method. Simply right-click the Applications button, and click Properties. Now just uncheck the option 'Show title in button'.

Another space eater is the Desktop Switcher. It looks like four big boxes in the right hand corner. This is handy if you spread your windows across separate spaces (one desktop for work, and one for games?). I have never really made good use of this feature and you don't need the switcher panel to switch desktops anyway (you can press Ctrl+Alt+Arrow Key and get the same effect. To get rid of the desktop switcher panel (it's actually called the "Pager") right-cick it and Remove it.

I am still collecting space saving tips myself - so I my add to this topic in the future. In the meantime here is what my tight-on-space desktop looks like.

EEE PC Network Manager Replacement; wicd

It was a really busy day at the office. But thankfully a third of my work today was waiting for software installations to finish. In this minimal off-time I was able to try out an alternative Network Manager for eeeXubuntu called 'wicd'.

The default network manager is "not bad", and it looks a little something like this ...


I have a few complaints.

1) It seems to lie about the signal strength, and sometimes it really drags when connecting me to a network or obtaining the IP address.
2) It doesn't give you a lot of options or additional information about the networks it finds. It's almost too simple.
3) It's connected to the Keyring application. That means it saves all of your WEP/WPA passwords safely - but every time you log in you are prompted for your master password. I made mine really long too. Woops.

With that, I went off in search of an alernative network manager. I found one mentioned in the eeeuser.com forums called 'wicd' which seemed to be well liked. The installation instructions were not very clear - so allow me to elaborate.

1) Open terminal and do a ' sudo mousepad /etc/apt/sources.list'. Then scroll to the very bottom and add these lines (the first is for your reference only) ...
# WICD.longren.org
deb http://wicd.longren.org gutsy all

2) In terminal, do a 'sudo apt-get update'. This may take a few moments.
3) Next, do a 'sudo apt-get install wicd'. Note that you cannot have *two* network managers, so you are going to lose network-manager and network-manager-gnome in the process. If you have stored away WEP/WPA passwords ... they will be saved in case you want to go back to the old manager. They will not however, be 'ported' to the new application.
4) When you say 'Y' to continue - the NetworkManager will *crash* and generate error messages. Because it is being removed. Don't panic. It's no big deal.
5) You may need to reboot. But try clicking Applications > Network > Wicd and launch the interface. If it's blank - reboot. Otherwise it will look a little like this ...


One thing was obviously missing, and that is the 'tray icon' down in the bottom right corner. Surely it has one, right? Of course it does, but you will need to add that to your 'Autostarted Applications' list.

6) Click Applications > Settings > Autostarted Applications. Then the 'Add' button. The name and decription can be whatever you like, but the Command box must read '/opt/wicd/tray.py'. Refer to this screenshot ...


7) Log out, and log back in. Now you should have a tray icon, and you can go to work.

I was not all that impressed with wicd, and at the end of the day - I went back to my default network manager. Here are my dislikes for wicd.

1) It's slower than the default manager, and it takes forever to scan the network and show you the results.
2) When it strikes an error or a problem joining a network - you are put on endless hold. There is a cancel button which *does* cancel the connection - and that is a plus.
3) It does not consolidate wireless networks. This was a dealbreaker for me. If I have 6 access points in range, all with the same 'SSID', it shows all 6 of them to me. I don't want to see all those, and it takes time to query and report on all of them!
4) This also lies about signal strength which tells me the driver is the root of that problem.

If you want to go back to the default manager:
1) Open a terminal and do a 'sudo apt-get install network-manager network-manager-gnome'. It will automatically remove 'wicd' for you, as you can't have both.
2) Remember to go into Autostart Applications and remove the wicd tray applet.
3) Perhaps reboot, although it may not be necessary as your old tray icon is probably back and functional again.

A note of caution - if you return to wicd a second time you may have issues. I found myself removing wicd, deleting the entire /opt/wicd directory, and reinstalling it again just to create some screenshots for this blog entry.

Tuesday, June 03, 2008

EEE PC Day 2 - Wardriving Attempts

After some late night last minute attempts to make Kismet work last night, I was actually graced with some a bit of minor success. Kismet loaded, and displayed some accurate capture information.


Now if only I could get my "production network tool" to play nicely. It seems to only want to connect to my home network, and disregards everything else it sees. When I search for other networks it finds them by name - but shows a very weak signal for them and won't seem to commit when I tell it to connect. It's a tad annoying, because I can pull out Audrey II (the Mac) and jump onto any one of these networks without a problem.


I am assuming the problem is:
1) The way the driver was written.
2) The utility demands a certain level before it will connect.
3) Power limitations to the card keep it running weaker, but longer on battery.
4) The card just simply is not that good.

It could be a number of those factors run together. I spent some time tonight searching for an option in the driver or with a wireless tool like iwpriv which would allow me to step up the power consumption to get a better wireless reach. I came up empty there. I guess my next step is to see if I can't find a replacement for this native wireless network manager. I hope to have these training wheels off soon. I am anxious to get back to wardriving.

Monday, June 02, 2008

The EEE PC Day 1

I was walktzing down the hall today at the hospital past the supply man with a cart of stuff, and he had something for me. My EEE PC had arrived a full four days ahead of schedule. As busy as this day was I still managed to find some time to play with my new toy.

Out of the box, I was pretty impressed with this little device. I have the 4G Surf model which has the smallest screen and keyboard of the bunch, but with 4GB of SSD flash versus 2GB. The default Operating System was "not bad", but it had all the makingd of kids computer. If Webkinz made an OS it would probably look a little like that. There were great big buttons spread amongst four tabs or so for launching applications. These ranged from Instant Messaging and multimedia stuff to limited "work" applications like Abiword. If this was the OS you were stuck with, these little machines would have never taken off.

Within 10 minutes or so I had decided that I was ready for a real operating system. With that, I got a copy of eeeXubuntu and ran through an installation. It was a bit cumbersome because I was unable to boot to my external CD-ROM drive as I had hoped. Instead, I had to use a thumbdrive to install from. This involved getting everything off my thumbdrive and creating a backup with 'dd'. Then I booted up to the eeeXubuntu live disc using a PC on my desk. Next I repartitioned and formatted my thumbdrive as a FAT16 drive - and ran a script from the CD-ROM to create a bootable and installable thumbdrive. From there - the install to my EEE PC was cake.

While the installation took the better part of an hour, once it was complete I was quite impressed with the speed. Booting seemed to take less than 30 seconds or so, and running applications was pretty pleasing. I've never spent much time using the default window manager 'xfce' but I will probably hold onto it a while. It's very thin, and there's not much eye candy. But the speed that you get is amazing.

With a good functional OS I tempted fate and installed all available updates. I did not do the 'dist-upgrade' as I have heard that certain things will be broken if you move up to the hardy release (current eeeXubunt runs gutsy 7.10). My updates finished at 5:00PM and I was out the door.

Since then, it's been a battle getting kismet installed. I am anxious to get back to wardriving but a wifi scanning app is essential. There are all sorts of issues with Kismet, madwifi, and the eee PC in general. From what I have read, people have got it working by mising new and old libraries and deb packages. I'm not sure I like that idea, so I have stuck to attempts. I got the latest Kismet source and built it pretty easily. It runs, detects my card, and gives no complaints ... but then it doesn't display anything. Of course, it also cripples the wireless driver which is rather typical for putting a device into monitor mode. Doing some more reading I found someone had posted a command to put things back in order and save a reboot ... 'wlanconfig ath0 create wlandev wifi0 wlanmode sta'.

And now, as I get ready for bed I thought "why not break this thing in and Blog a bit". The keyboard is definitely awkward being so small ... but the first keyboard I ever used was a lot like this (TRS-80 Color Computer). I think the 3-Com Audrey keyboard was also about this size. I'm probably chucking out typos a-plenty - but fuck spell checking. There also seems to be some running joke about finding punctuation marks on this thing, but since it's marked so well - it shouldn't take you any more than 10 minutes to become acustomed to the layout.

I look forward to the adventures I will have with this little toy.

*EDIT* It's tough to go to bed with a job unfinsihed. After reading a few entries to the Kismet mailing list, I found that my madwifi driver needed an option to be passed to it at the time it is loaded for Kismet to run properly. I will spare you the bloody details. If you are interested however, you can read this post from the eeeuser.com forums.

Tomorrow - we wardrive.

Sunday, June 01, 2008

Blog Upkeeping

I was digging through a drawer a few days ago and I came across a "web server backup" that I had made in late 2005. At that time, I was still administering a web server from work which I used to host Gloop.net. The domain name, and the server, have both long since been dead and forgotten. With them went a lot of pictures that I had put in my blog over the years. I have always been a little sad that my older blog posts are now photo-less and plagued with dead link boxes.

Vowing to fix the image problem, I slowly began to work my way through old blog posts identifying the images that are now dead, and fixing them by uploading them to Blogger (which actually uses Picassa to store them). Hopefully Blogger.com will outlive me, and I never have to worry about repairing dead links again.

I was only halfway through the year 2003 when I realised that my Blog has some other problems. Namely that my commenting feature has always been hosted by Haloscan.com. At the time I started my blog, the Blogger service did not have a commenting feature. This of course predates when Google bought them ... and it was before Wordpress ever came into existence. In it's hayday, Haloscan served me well. These days, their servers are slow as hell and add what seems like a 45 second delay to my page loadings.

I have spent a good two to three hours copying those Halsoscan comments and pasting them into my Blogger entries. So if you are rolling back in time and reading old Blog entries they will appear in the post as "Historic Comments". Future comments will now be hosted by Blogger! I could have just switched to Blogger comments, and dumped the old ones. But I love reading those old comments from my friends. :-)

I also dropped a new theme overtop of the old one, which I have probably had for at least 3 years .... maybe longer. It's not what I want - but I will work on that later. Now, I need to cook dinner. I'm making Strombolli!